ShopDreamUp AI ArtDreamUp
Deviation Actions


Description
I produce all my digital art using Autodesk Sketchbook Pro 2010 [link] (and I used older versions of the same program back to Alias SketchBook Pro 2).
I use a tablet PC (where I draw directly on the screen) and find SketchBook Pro by far the most intuitive art package for pen use - all the tools like cut, resize, rotate, move, scale etc are all intuitively pen driven.
I've been asked how I produce my realistic art and comic book style art with smooth solid lines, as I use some customisations, so I thought it might be helpful to produce this basic tutorial for using SketchBook Pro for my style of digital art.
Starting Off
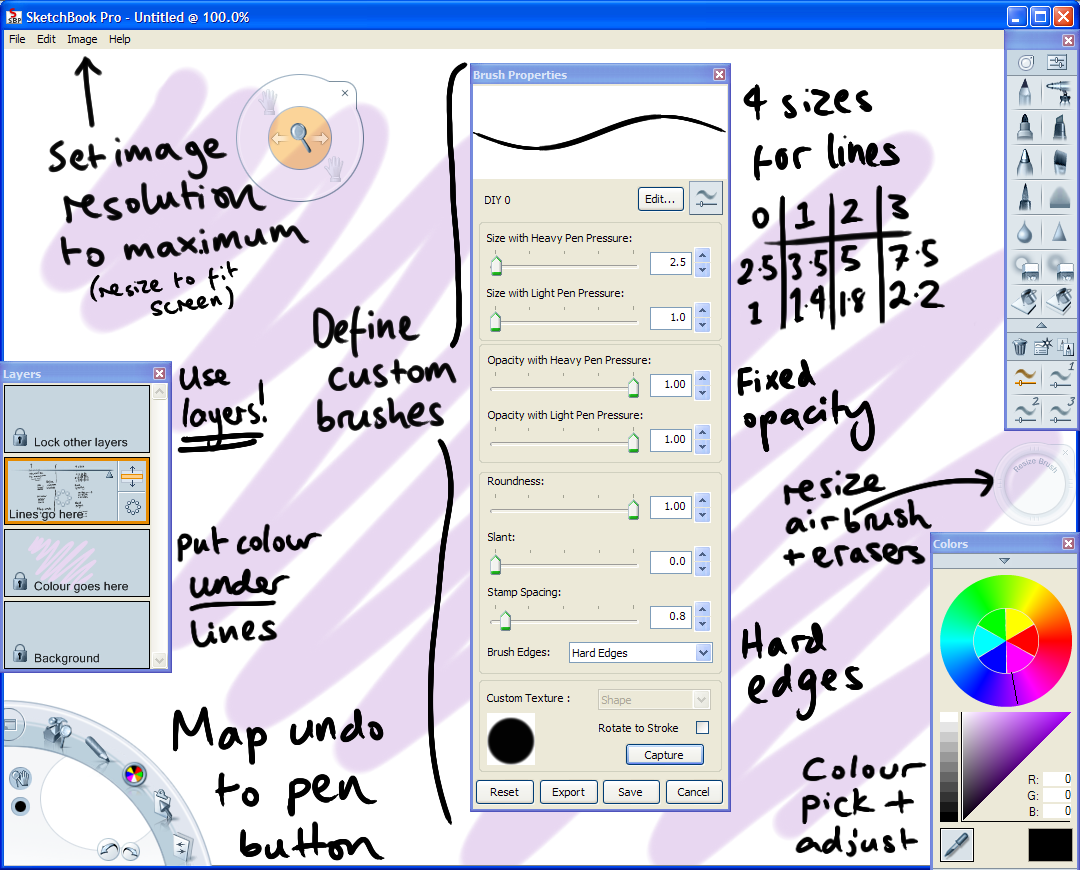
First of all, I work at the maximum resolution (Image Size) possible so if it ever needs to be used in print, the detail's there. It's easy enough to scale down later if you need it, but very difficult to add details when you've started at a low resolution!
Open the dialogs for Layers, Tools, Colours and the Resize Brush Tool and position them on screen. If you've only got one screen and you're working off a digital reference image, resize the window to allow the reference image to appear on one side of the screen and put the tool and colour selectors underneath it.
Even if you're only working on one layer, lock off the background and create a new layer to work on. The background is opaque and the other layers transparent - again, it's easier to change your mind draw a background under the image when you've started with a transparent background rather than solid white.
Digital Painting/Airbrush
My digital paintings are drawn entirely with the airbrush tool (and soft eraser) - I use the resize brush tool (shown on the middle right here) to make the airbrush large and start to draw a 'blurry' sketch. Once I've drawn what I want at that blurry resolution, I gradually reduce the size of the airbrush and draw with increasingly higher levels of detail. I eventually 'zoom in' with the resize tool to work on the finer details, like, say, an eye.
I colour 'by eye', choosing a colour from the colour wheel, then from the triangular darkness/saturation selector. Once I'm working with a colour that's already on screen, I always start by colour-selecting the closest colour then adjusting it slightly.
Line Art
When I'm working with line art, I don't use any of the preset brushes (other than the hard eraser, resizing as needed) but instead work with a set of four custom brushes all of which have fixed opacity and variable width - the minimum and maximum widths vary from 1 pixel with low pressure and 2.5 pixels with high pressure on the smallest brush, up to 2.2 on low pressure and 7.2 on high pressure. I don't resize these brushes, just switch between the 4 presents as needed.
The most important thing to stress is to lock off the background and create a separate lines layer (or sketch layer, that you'll later turn off, if you need it). When you start colouring, you'll do this on a layer under the lines meaning you can get the lines perfect and even adjust them later without touching the colours, and you can easily erase any overlap of the colours out of the lines without worrying about touching the lines.
Obviously you don't have to have one layer for the lines; on my current project I have 10 separate lines layers, not including the sketch and background. If you have the discipline to keep layers separate (seriously, lock off the layers when you're not using them) you can then move props and characters around, even over top of each other before you decide to lock them off and colour under them.
Background
Whether it's coloured line art or a digital painting, you probably want to add a background when you're finished. Now you can unlock your background layer, make the biggest brush possible and draw in the background behind everything else. Alternatively, if you're working on something that's very light or includes a lot of white, you may want to add a dark background early on.
Sometimes I draw a background in low resolution with much larger brushes than I can get at higher resolution before anything else, then increase the resolution and draw in sketch, lines, painting etc. You can always turn off the background layer so it's white until you need it.
Another tip I've used once or twice is to export the image as a .PSD when you've finished and use a photo editing application to blur the background layer (or perhaps and extreme focus foreground level) to add depth/realism.
Final Tips
Tablet PC and Cintiq screens get less accurate towards the edges of the screen, so always move the area of the image you're working on towards the centre of the screen. Don't use the scroll bars, use the move tool - the scroll bars won't let you move a corner into the middle of the screen, move will.
Save early and often! Make backups! Also, as undo is limited, save copies after every significant change so you can go back to older versions if you need to (this also helps you make step-by-step images like this [link] when you're finished).
If you're going to do a sketch, do it on a level above the background and use a colour other than black so you can reduce the opacity and draw over top of it in black (I use baby blue). Once you've finished with the sketch turn it off (select the eye by dragging left from the layer) rather than deleting it.
Map the undo function to the button on your tablet pen so you can undo without having to move the pen away from what you're doing. Trust me, I use undo a ludicrous amount of times - my lines are so smooth because I do big fast strokes and immediately undo them if they're not perfect. Also don't be afraid to use move, resize, squish and rotate to improve the composition and proportions of the lines you've already drawn.
Version 2010 can now squish as well as rotate, move and resize, but if you need to make more complicated changes (like changing gamma correction or colours) without flattening the image export as a .PSD file and make changes to individual layers in Gimp (free) or Photoshop (expensive).
Seriously, lock off the other layers as soon as you move between layers. Make it your second nature to lock off the layer and unlock the next layer as you move between them (it's only a diagonal stroke after all). There is nothing more annoying than realising you've spent the last hour drawing black lines over the sketch layer (although adjusting the opacity of the sketch layer makes that more obvious) or the background!
SketchBook Pro costs money, but there's a free 15 day trial available to help you decide if it's right for you [link]
Let me know if you found this tutorial helpful and have fun!
I use a tablet PC (where I draw directly on the screen) and find SketchBook Pro by far the most intuitive art package for pen use - all the tools like cut, resize, rotate, move, scale etc are all intuitively pen driven.
I've been asked how I produce my realistic art and comic book style art with smooth solid lines, as I use some customisations, so I thought it might be helpful to produce this basic tutorial for using SketchBook Pro for my style of digital art.
Starting Off
First of all, I work at the maximum resolution (Image Size) possible so if it ever needs to be used in print, the detail's there. It's easy enough to scale down later if you need it, but very difficult to add details when you've started at a low resolution!
Open the dialogs for Layers, Tools, Colours and the Resize Brush Tool and position them on screen. If you've only got one screen and you're working off a digital reference image, resize the window to allow the reference image to appear on one side of the screen and put the tool and colour selectors underneath it.
Even if you're only working on one layer, lock off the background and create a new layer to work on. The background is opaque and the other layers transparent - again, it's easier to change your mind draw a background under the image when you've started with a transparent background rather than solid white.
Digital Painting/Airbrush
My digital paintings are drawn entirely with the airbrush tool (and soft eraser) - I use the resize brush tool (shown on the middle right here) to make the airbrush large and start to draw a 'blurry' sketch. Once I've drawn what I want at that blurry resolution, I gradually reduce the size of the airbrush and draw with increasingly higher levels of detail. I eventually 'zoom in' with the resize tool to work on the finer details, like, say, an eye.
I colour 'by eye', choosing a colour from the colour wheel, then from the triangular darkness/saturation selector. Once I'm working with a colour that's already on screen, I always start by colour-selecting the closest colour then adjusting it slightly.
Line Art
When I'm working with line art, I don't use any of the preset brushes (other than the hard eraser, resizing as needed) but instead work with a set of four custom brushes all of which have fixed opacity and variable width - the minimum and maximum widths vary from 1 pixel with low pressure and 2.5 pixels with high pressure on the smallest brush, up to 2.2 on low pressure and 7.2 on high pressure. I don't resize these brushes, just switch between the 4 presents as needed.
The most important thing to stress is to lock off the background and create a separate lines layer (or sketch layer, that you'll later turn off, if you need it). When you start colouring, you'll do this on a layer under the lines meaning you can get the lines perfect and even adjust them later without touching the colours, and you can easily erase any overlap of the colours out of the lines without worrying about touching the lines.
Obviously you don't have to have one layer for the lines; on my current project I have 10 separate lines layers, not including the sketch and background. If you have the discipline to keep layers separate (seriously, lock off the layers when you're not using them) you can then move props and characters around, even over top of each other before you decide to lock them off and colour under them.
Background
Whether it's coloured line art or a digital painting, you probably want to add a background when you're finished. Now you can unlock your background layer, make the biggest brush possible and draw in the background behind everything else. Alternatively, if you're working on something that's very light or includes a lot of white, you may want to add a dark background early on.
Sometimes I draw a background in low resolution with much larger brushes than I can get at higher resolution before anything else, then increase the resolution and draw in sketch, lines, painting etc. You can always turn off the background layer so it's white until you need it.
Another tip I've used once or twice is to export the image as a .PSD when you've finished and use a photo editing application to blur the background layer (or perhaps and extreme focus foreground level) to add depth/realism.
Final Tips
Tablet PC and Cintiq screens get less accurate towards the edges of the screen, so always move the area of the image you're working on towards the centre of the screen. Don't use the scroll bars, use the move tool - the scroll bars won't let you move a corner into the middle of the screen, move will.
Save early and often! Make backups! Also, as undo is limited, save copies after every significant change so you can go back to older versions if you need to (this also helps you make step-by-step images like this [link] when you're finished).
If you're going to do a sketch, do it on a level above the background and use a colour other than black so you can reduce the opacity and draw over top of it in black (I use baby blue). Once you've finished with the sketch turn it off (select the eye by dragging left from the layer) rather than deleting it.
Map the undo function to the button on your tablet pen so you can undo without having to move the pen away from what you're doing. Trust me, I use undo a ludicrous amount of times - my lines are so smooth because I do big fast strokes and immediately undo them if they're not perfect. Also don't be afraid to use move, resize, squish and rotate to improve the composition and proportions of the lines you've already drawn.
Version 2010 can now squish as well as rotate, move and resize, but if you need to make more complicated changes (like changing gamma correction or colours) without flattening the image export as a .PSD file and make changes to individual layers in Gimp (free) or Photoshop (expensive).
Seriously, lock off the other layers as soon as you move between layers. Make it your second nature to lock off the layer and unlock the next layer as you move between them (it's only a diagonal stroke after all). There is nothing more annoying than realising you've spent the last hour drawing black lines over the sketch layer (although adjusting the opacity of the sketch layer makes that more obvious) or the background!
SketchBook Pro costs money, but there's a free 15 day trial available to help you decide if it's right for you [link]
Let me know if you found this tutorial helpful and have fun!
Image size
1080x870px 398.26 KB
Comments131
Join the community to add your comment. Already a deviant? Log In
Hi Nat, Thanks for this great tutorial on Sketchbook Pro. I have been taking photographs for many years, but at the back of my mind there's always been an artist trying to get out. I am dipping my fingers into digital painting, and after trying a trial of Painter X3, and Artrage, I am finding Sketchbook 4 the easiest to work with. As a retired design engineer, I have lots of experience with Autocad, another Autodesk product, and I suspect some of the goodies in their advanced products have found their way into Sketchbook Pro. I was very interested to hear how long you have spent on some of your excellent wildlife paintings. I am working on a rose, using a photo I took for reference. My progress is extremely slow, it really is like watching paint dry. Hopefully I will finish the project in about a week, and I'll be brave and stick it in my gallery to see the response. So thanks again for the tutorial and the great images in your gallery.
Kind regards, Ralph